7 Steps to Inbox Zero and Better Email Management
Does anyone struggle with email overload, management, and the quest for “inbox zero”? Is anyone willing to admit they’ve got a few hundred unread emails in their inbox? Even worse, does anyone have a few thousand READ email messages that eat up your mailbox storage?
Email overload is an affliction that affects millions of Outlook email and Gmail systems across businesses of all sizes. The corporate communication standard has devolved from face-to-face communication to email.
Meeting minutes. FYIs. Carbon copies. Blind carbon copies. CYA emails. Response to your CYA. A seemingly endless set of reactions to your CYA email was CC to the department and the BCC to the next management level. All are delivered via email.
There is too much email. Despite all the iPads, smartphones, tablets, laptops and work-from-home access to corporate email, there has to be a better way to tackle email overload and reach the coveted “inbox zero”.
My Inbox Zero Email Management Method
After several attempts at better email management, I found an approach that works for me every week. I’ve switched to a simpler folder system, which includes the following:
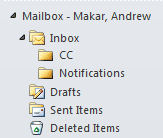
- Create the following folders in your email system
- CC
- Follow Up
- Projects
- Archive
- Automatically move any emails where you are carbon copied to the CC folder
- Any emails marked for Follow Up appear in the Follow Up folder
- Any critical project-related emails go into a Project folder
- Move attachments to the Archive folder
- Optionally archive or delete everything else in your inbox
- Clear the Follow-Up folder each day
- Delete the Archive, Notifications, and CC inbox contents each month
Important emails or specific project-related issues can be stored in a Project subfolder, saved as a PDF, and stored with the project archives. Any email where I am CC’d is immediately deemed a lower priority than those on the To: subscriber line. You still need to read those emails, but they are secondary to managing the primary emails in your inbox.
Deleting emails from the inbox may seem risky to an email hoarder like me, but you can always go to your Sent mail folder to find the correspondence or reach out to the original sender. Having an inbox of 600 unread emails isn’t a bragging right, as that’s 600 more emails you eventually need to read.
Use Automated Rules
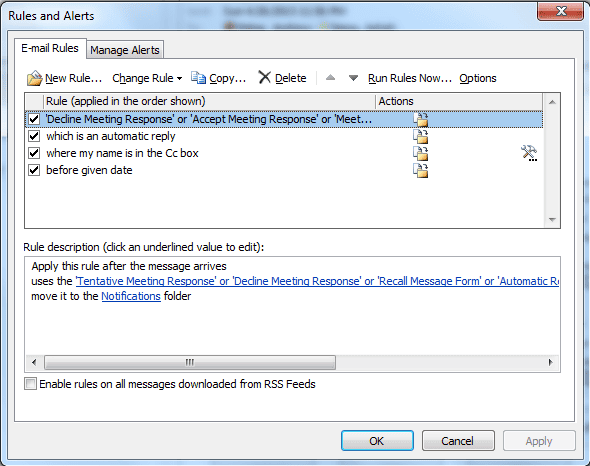
I’ll guess that most corporate America uses Microsoft Outlook, Lotus Notes, or a fully functional email tool to manage their calendar, email, and contact lists. These desktop tools support automatic rules that move emails to different folders. I use automated rules to keep the inbox organized, and I run the following rules every few days to clear out the inbox.
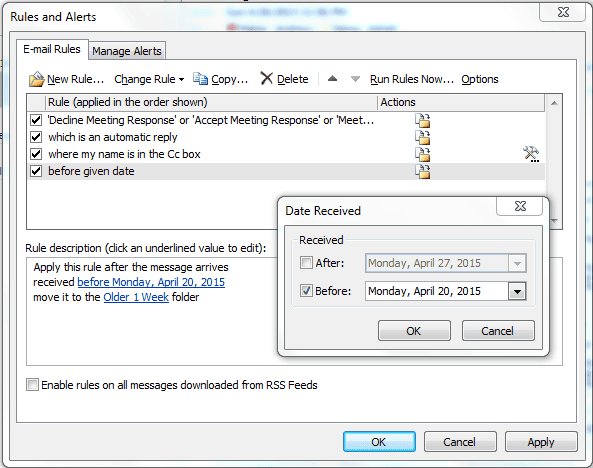
Rule #1 Move all Meeting Decline, Meeting Accept, Tentative meeting responses, and Automatic Responses to a Notifications folder
Rule #2: Move all emails where my email address is in the CC line to a CC folder
Rule #3 Move all emails before a given date into the Archive folder
This rule also allows you to skip any emails marked for Follow-up. You want to keep those in the inbox.
You can easily configure these rules in Outlook, and with some tinkering, you can do the same in Lotus Notes, Apple’s Mail app, and web-based Gmail.
How to Setup Microsoft Outlook Email Rules
With just a few quick clicks, you’ll be on your way to email Inbox mastery with these Microsoft Outlook rules.
Step 1. Create Your Folders
- Click on the Inbox folder
- In the Outlook Ribbon bar, click on the Folder tab – New Folder icon
- Enter the name of your folder (CC) and click OK.
- Repeat for the Notifications and Archive folder
Please note the Archive folder. I recommend creating a separate PST file and storing it on your local drive so all your archived mail doesn’t consume the server disk space.
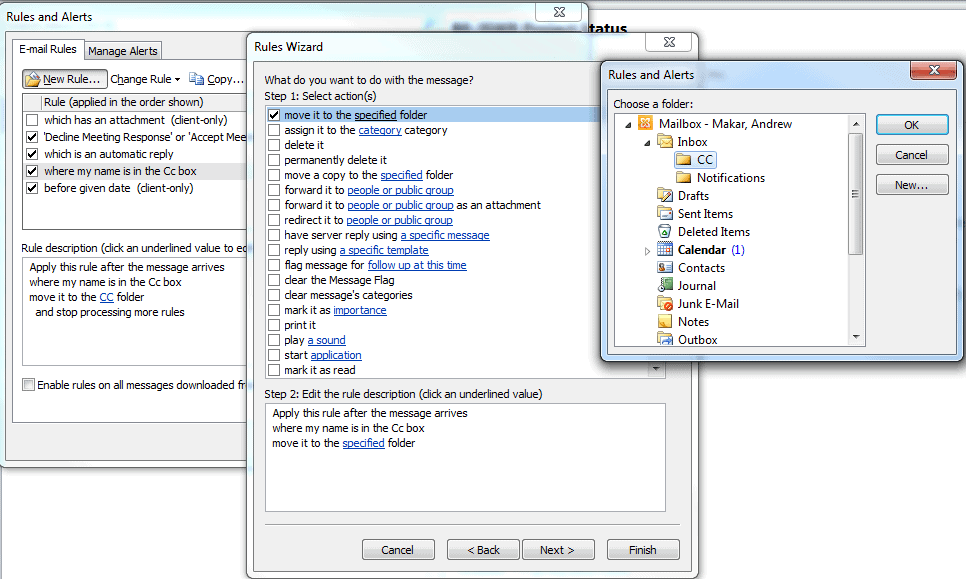
Step 2: Setup the CC Rule
Follow these steps to set the CC rule
- In the Outlook Ribbon bar, click on the Home tab – Rules icon – Manage Rules and Alerts
- Click on the New Rule button
- Click on “Apply Rule on Messages I receive”
- Click Next
- Click on “where my name is in the Cc box”
- Click Next
- Click on “Move it to the specified folder”
- Enter the name of your folder (CC)
- Click Ok.
- Click Next
- Click Next again
- Enter the name of the rule
- Click Finish

Step 3: Setup the Notifications Rule
The notifications rule is similar to the CC rule and is easily created by following the prompts.
- In the Outlook Ribbon bar, click on the Home tab – Rules icon – Manage Rules and Alerts
- Click on the New Rule button
- Click on “Apply Rule on Messages I receive”
- Click Next
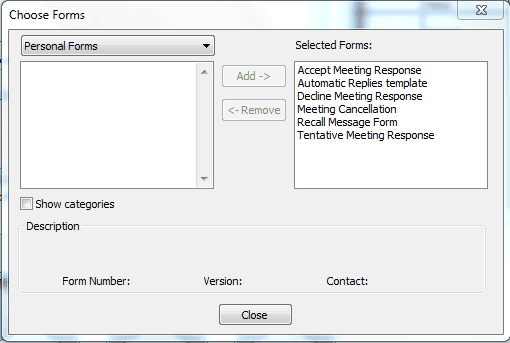
- Click on the “uses form name form”
- Click on the form name link
- Select Application Forms
- Add the Accept Meeting Response, Automatic Replies template, Decline Meeting Response, Meeting Cancellation, Recall Message From, and Tentative Meeting Response forms
- Click Close
- Click Next
- Click on the “move it to the specified folder”
- Select the Notifications folder
- Click Next
- Click Next again
- Enter the name of the rule
- Click Finish
Step 4: Setup the Archive Rule
The notifications rule is similar to the CC rule and is easily created by following the prompts.
- In the Outlook Ribbon bar, click on the Home tab – Rules icon – Manage Rules and Alerts
- Click on the New Rule button
- Click on “Apply Rule on Messages I receive”
- Click Next
- Click on the “received in a specific date span”
- Click on the “in a specific date span” link
- Click on the Before check box
- Enter a date
- Click Ok
- Click Next
- Click on the “move it to the specified folder”
- Select the Archive folder
- Click Next
- Click Next again
- Enter the name of the rule
- Click Finish
Step 5: Run Your Rules
Your rules will run automatically as email enters your inbox, except for your Archive rule.
From the Rules and Alerts dialogue box:
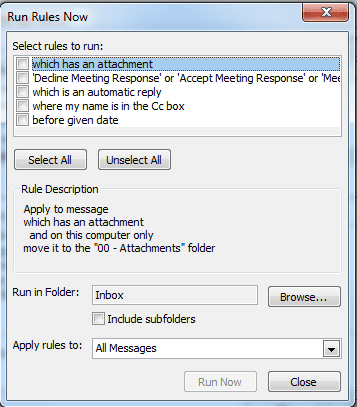
- Click Run Rules Now
- Select all the rules you’ve defined
- Run in the Folder: Inbox
- Check the Include subfolders option
- Click Run Now
In the screenshot below, I’ve created additional rules I chose to run as needed.
Within a few seconds, you’ll quickly see all your emails get sorted and archived, and now you can enjoy empty inbox email bliss.
Caveats
This email management process works well and creates a clutter-free inbox that only leaves today’s email and a few follow-ups in the inbox. However, you must check the CC and Notifications folder to avoid missing out on critical responses. I’ve missed a Decline notice with a Propose New Time request several times, so remember to check the folder.
Better email management means keeping your inbox clean and organized, but you don’t want to miss a critical request among your 600 organized emails. Run those rules and enjoy achieving inbox zero and an empty inbox. You’ll feel the momentary Zen-like peace until the following email shows up.
Recommended article: Clean Up Your Inbox In Minutes with InboxZero