Finding Late Tasks with Microsoft Project Custom Filters
In this Microsoft Project Tutorial, you’ll learn how to use a custom filter to find late tasks in Microsoft Project.
When managing a project schedule of even a moderate size, it’s valuable to quickly identify late tasks without scrolling through a large hierarchy of tasks. In Microsoft Project, you can locate incomplete, late, or slipped functions by using one of these options:
- Tracking Gantt view
- Incomplete Tasks filter
- Late Tasks Assigned to Resource filter
- Slipped/Late Progress filter
These built-in filters are excellent, but I usually need to filter on a different set of criteria to view the data I like to see. So, I created a custom filter in Microsoft Project that would identify late tasks.
Finding Late Tasks the Easy Way
My original approach was to identify a late task by filtering on the % Complete field, the Baseline Finish, the date, and the Resource name column. I followed these steps:
1. Select the Tracking Gantt View using the Entry Table.
2. Insert Baseline Start and Baseline Finish.
3. Confirm the % Complete column is in the view.
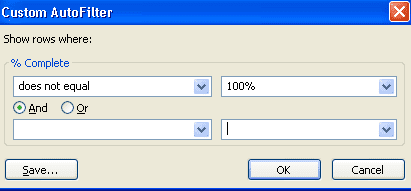
4. Filter on the % Complete column (Figure 1).
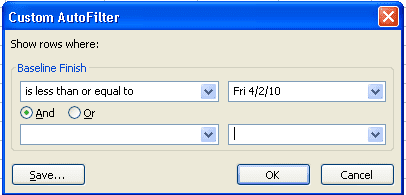
5. Filter on the Baseline Finish date where the Baseline Finish Is Less Than Or Equal To a given status date (Figure 2).
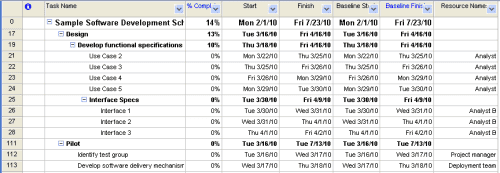
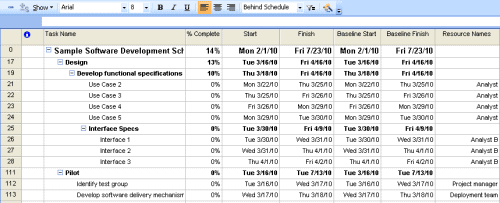
The resulting schedule identifies all the unfinished tasks and can be filtered by resource (Figure 3).
This approach worked to generate a list of late tasks for project status reviews; however, once I switched views or needed additional information, I had to remove the filter and then rebuild it a few minutes later. This process quickly became tiresome when viewing late tasks. The need for a quick and reusable filter to identify tasks behind schedule led me to create a custom filter that I named Behind Schedule.
Finding Microsoft Project Late Tasks the Easier Way: Behind Schedule filter
You can create your custom Behind Schedule filter by following these steps:
1. Select Project | Filter For | More Filters and click New.
2. Enter “Behind Schedule” in the Name field.
3. Click the first row in the Field Name and select the Baseline Finish field.
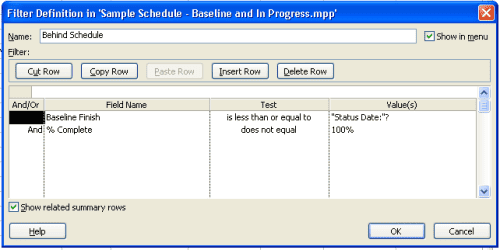
4. Enter “is less than or equal to” as the test condition.
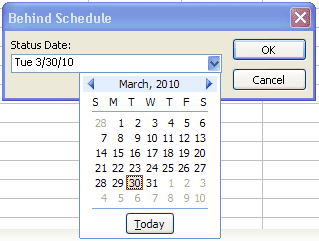
5. Enter “Status Date:”? into the Value field (Figure 4).
(It is important to enter the question mark after the quoted value, as this represents a parameter. The text entered between the quotation marks is the actual text that will appear in the dialogue box.)
6. Click the second row and select the % Complete field.
7. Select the “does not equal” Test condition and enter 100% as the value in the Value column.
8. Click the OK button (Figure 5).
Using the Behind Schedule filter
Click the Behind Schedule filter in the Formatting toolbar to use the filter and select the Project Status date. The filter will identify incomplete tasks based on a chosen date (Figure 6).
To clear the filter, click All Tasks in the Filter combo box, and all the project tasks will be displayed.
Three key points about using the custom filter
1. Remember to baseline.
For the filter to work, you must baseline (gasp) the project schedule. If project teams are hesitant to baseline the entire schedule, you should apply a rolling planning approach and baseline the tasks for the next phase or significant milestone.
2. Look at Slipping Tasks.
The Behind Schedule filter identifies only incomplete tasks that have exceeded the baseline finish date. I encourage you to also look at the Slipping Tasks and Slipped Tasks\Late Progress to identify functions with impacted start dates.
3. Add the filter to your Global.mpt file for future projects.
The Behind Schedule filter that you created is a local filter available only in the current .mpp file. If you want this filter to be available for all your projects, you need to add it to your Global.mpt file, which contains all the custom objects for your Microsoft Project files.
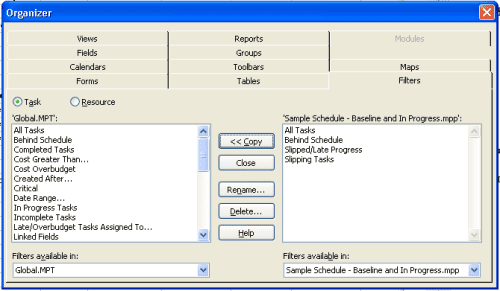
To add a custom filter to your Global.mpt file, select Tools | Organizer | Filters, the Behind Schedule filter, and click the Copy button (Figure 7).
Conclusion
Following the steps outlined in this tutorial, you can create additional filters based on your criteria. If you have a favorite filter or a request for a specific filter, please comment below, and I’ll see if I can assist!
Suggested articles: Microsoft Project Tutorial: Import Excel Into MS Project | The Pros and Cons of Using MS Project Software